Friday, October 5, 2012

Project 25: It Ain't Always Sunshine and Roses

The past few weeks have been a little crazy. To start off, there was the Jenkintown Arts Festival, which was awesome. I had lots of people interested in my work, which is always a nice ego boost. I was interviewed for a Temple University student paper. I don't actually know if I will be in the article that's being written, but that's pretty awesome.
Second crazy thing: I got a big girl job! This is awesome because I'm taking a step closer to independence and it's money. The downside is that I will have less time to do these projects. I already was falling behind. So we'll see how it goes!
Third crazy thing: I purchased a glass kiln! It's super awesome. I'm thrilled. It's like Christmas! I'll have a million more options for my project. This project I was testing out my bad-ass kiln by trying to make a plate. Unfortunately, things went awry and the finished project cracked in half... I didn't have enough glass to try again, so I decided to just post what I have to show I gave it the old college try. 


The Process:
The basics of glass fusing, or at least how I understand it, is as follows. Only certain glasses can be fused together. The glasses must have the same melting points and cool at the same rate or else the finish product can crack or distort. You need at least 2 layers of glass to do fusing. At a minimum there is a base layer and then a decorative layer. I didn't have a big enough single piece of glass to use as a base for my plate, so I used two half pieces. 


The decorative layer has the same process as stained glass in some ways. I drew up a pattern, cut out my pieces and ground them to fit nicely. I used glue to hold the pieces in their correct places. Glue isn't necessary for fusing, but it can be useful when transferring into the kiln. However, I either didn't let the glue dry long enough or I used way too much. You'll see why.


Next, I put the piece in the kiln to do a 'full fuse'. This means that all the pieces completely melt together. The glue caused bubbles to form in between the two layers of glass. It's a little hard to see in the picture, but I was frustrated with it.


The last step in the plate project is called 'slumping'. The fully fused piece of glass is placed atop a mould and then fired in the kiln. It is fired at a temperature that is high enough to cause the glass to get floppy, but not so hot that the pattern is distorted.


Final Product:
I don't really know why the plate cracked. It cracked at a point where the glass was still settling because the 2 pieces don't fit together properly. It may have been the glue, it may have been something else. I don't know. Hopefully, I'll be successful next time.


Wednesday, September 12, 2012

Project 24: Orchids


Guess who is in the ball this week? This girl is!! I decided Project 24 would be flowers. Orchids specifically. I found a lovely picture of a cluster of orchids. I am not sure how well the picture actually translates into a window. The flowers may be muddled together. I go back and forth on my opinion. But anyway, form your own opinion!


The Process:
It starts with a design.


I cut out the pieces.


I foiled said pieces.


Then soldered.


I added a frame.


Finally, the finishing touches (Patina!).


 Final Product:

                           Beautiful Orchid!


Sunday September 23rd, I will be participating in the Jenkintown Arts Festival. A picture of one my pieces made it onto the website! Can you figure out which one? Anyway, I'm excited and if you have nothing better to do that Sunday come check it out.

Tuesday, September 4, 2012

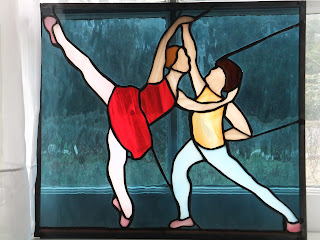
Project 23: Hold Me Closer Tiny Dancer


I'm terribly sorry for the absence. I don't know where my time has gone. So this 'week's' project is of ballet dancers. I love to do dancers and aerialists. I think they are incredibly elegant and I think that grace and beauty translate nicely into glass. Plus, my mother was an aspiring ballerina in her younger days, so whenever I make dancers, I'm making them for her. These dancers were inspired by a series of photos of I saw in the NY Times newspaper a couple of months back

Here are other windows I've made in the past:

Dancers 

Aerialists

The Process:
I started by making a pattern.


 I cut out all the pieces and foiled them.


The most time consuming part of this project was that I essentially made three panels and then combined them into one. Each dancer panel had to be made square and had to be the same height as the other panels. Getting the panels to be the right dimensions was very frustrating. The next step was to solder the three panels separately.


I connected the three panels with 'H' channel and then framed the whole panel. 


Lastly I put on a patina and I was finally finished!

Final Product:

Without Light


Wednesday, August 15, 2012

Project 22: Boxes Upon Boxes

You may be be thinking "Wait, didn't you just make a box?" How very observant of you! Yes, indeed I did. Project 20 was a box. So what's the deal? As you may remember, last week I was in Ohio to attend a friend's wedding. While I was there, I was able to go down to Kenyon (my alma mater) to visit some friends. One of those people was my stained glass teacher Carol. Carol worked for many years as a glass artist and one of the ways that she was able to live off her art was to make glass boxes to sell wholesale to retailers, like museum gift shops. I took the opportunity to pick her brain about how to improve my box-making and she had a lot of good advice. So even though I just did a box, I was anxious to try out all my new tricks. 


The Process:
To start, I made myself a board to make the boxes on. I made two different sized corners so I can  ensure my boxes are square. 


The first tip I learned from Carol was that you can't draw up a pattern for the entire box before you start. You start with the top of the box, make that first and everything else, sides, base etc are cut in relation to the top. I bought little mosaic tiles and soldered those together to make the top.


Next, I cut glass strips of uniform width. I used the top to mark the length of the sides.  Tip number 2 is to measure the the length of the sides and then cut off a piece twice the thickness of the glass.

The funny part is that these aren't the pieces I ended up using
These were too short and I had to cut new ones. >.<

The sides and lid were tack soldered into place and I used my board to ensure that everything was square. 


I cut a piece of mirror to serve as the base (another one of Carol's ideas!).


I soldered both the base and the lid fully.


The last trick that Carol taught me was a new way to do hinges. Instead of using the pin hinge like I used earlier, I took a brass tube and cut it to the length of the side. I soldered the tube to the lid. I threaded a piece of copper wire through the tube. I bent the wire at either end of the tube to keep the lid from sliding back and forth. Finally, I soldered the ends of the wire to the seams on the base of the box.


Final Product:
So here's where I need opinions. I decided to patina the box, so my solder lines wouldn't look so lumpy. But I can't decide if that was a good choice. If you're bored and feel like giving me input, let me know if you prefer the silver lines or the black ones. Thanks :)

Silver:


Black
It's so tiny!


A big thanks to Carol for being so willing to answer all my questions and impart so much wisdom and guidance!

Monday, August 6, 2012

Project 21: Wedded Bliss

This project was a secret project! My lovely friends Kyle and Melanie got married this past weekend and I decided to make them a window as a wedding gift. But I couldn't post about it until after I gave it to the happy couple, so I'm a little late. There is a picture of Kyle and Melanie on facebook that I absolutely love. It is of the two smiling lovingly into one another's eyes. Sounds sappy when I say it, but it's an adorable picture. So I decided to do an interpretation of that picture. 


The Process:
So the first step was the make a pattern. I simplified the photo a lot. I intentionally took out as many specific facial features as possible. I left in the lines that would give the illusion of their faces and expressions without potentially cluttering and muddling things.


Next step was cutting the pieces and then foiling them.


Then I soldered everything.


And framed it.


Finally, I added a patina.


Final Product:


As you can see, I had to stray a little from the colors in the picture. For example, Kyle is not in fact a member of the Weasley family. Also, I chose to make Melanie's shirt a purple instead of a gray because a) I like the purple glass and b) I didn't have any gray glass.