Saturday, March 24, 2012

Project 6: A Lesson in Suspension

This week has been crazy! I spent the majority of my week babysitting my favorite 2 year old. Last Saturday, I hung out with him from 9-4. At about 1, I was ready for a nap and I was hoping that maybe he would be too. We were in his room. He was playing with trains, I was lying on the floor. I looked up at the ceiling, wondering how I was going to convince him to take a nap and I saw that he had a mobile hanging from his fan. My thought, "hey, I could totally make one of those!" So that's where the idea came from. I also thought that it would be a less time intensive project, which would work with my schedule. However, I always seem to underestimate my projects, or maybe I just overestimate my abilities. Who knows? 


The camera that has all the pictures of my birds coming to fruition is currently in Indiana. So there won't be any pictures from the process.


The birds are the same bird in different colors. I'm sure you figured that out though. I drilled holes in their heads and tails to suspend them from my hoop.


The hoop is made out of 1/4 in copper pipe. Bending that into a circular-ish was such a pain! You can see it's not quite there, but that was all I had patience for.

After the birds and the hoop were finished. I simply had to tie the birds in place, which, again, took a stupidly long time.


I like this picture because you can't see the strings
and the birds actually look midflight.

This project to me is a good mark for the start of spring, which was officially the 21st I believe. Happy spring!

Friday, March 16, 2012

Project 5: An Illuminated Kingdom

This week's project is essentially a fancy floating candle holder. I'm not really sure where I got the idea, but I knew I wanted a castle, water and flames. Some castles have moats, so I went with that. The candles sit in the moat and illuminate the castle. I was sort of imagining the scene in Harry Potter and the Sorcerer's Stone when the first years travel by boat to get to Hogwarts and their minds are blown when they see how breathtaking the castle is. My castle is not nearly so ornate or immense, but in my head, it's a rockin' castle.  

Harry Potter! See what I was shooting for?
 
The Process:
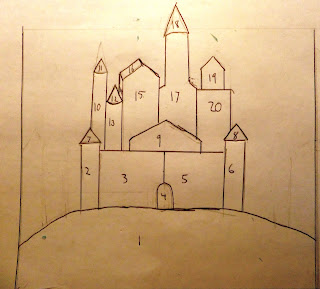
First things first, I had to sketch my design for both the castle and the box. I made the box pretty boring. It's 5"x 7" if that helps put the size of the project in perspective. 


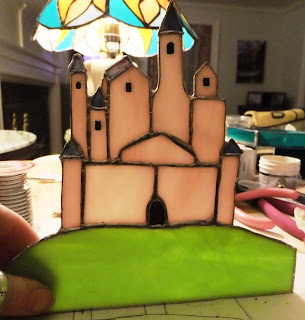
A pattern was made from the sketch and the actual pieces of glass were cut out. It's hard to tell from the pictures but my castle is a light purple-y color and its roof is a deep blue. 

Lined up and ready to be cut.

Layout

The pieces are foiled and soldered together. The nails are used to hold the pieces in their correct position so the don't move around during the soldering process.
This reminded me of Voodoo 


The box construction was pretty standard as far as boxes go. It had a base and four sides.


In the picture below, you will notice that there is copper foil running down the center of two sides. I keep forgetting that glass is fragile and not pliable. While trying to make sure my castle would fit correctly into the box, I pushed too hard and cracked the side. It was a happy accident because the foil ended up giving me a place to attach the castle to the box, but I was mad at myself for cracking another project.


Last step was to attach the castle to the box. I put water in my moat, which you can sort of see in the pictures and added my candles. I struck a match and hit the lights and took a whole bunch of pictures.


 End Result:


Backlit

This reminds me of a fortress with flames to deter invaders! 


Friday, March 9, 2012

Project 4: Ship Out of a Bottle

This is the realization of the project I tried to do two weeks ago and couldn't. See project 2. I decided to make a ship out of a bottle. Like a ship in a bottle, but a little less intense. 


The Process:
I started with a wine bottle. One of the more frustrating parts of this project was getting the labels off the bottle. Shouldn't be that hard right? Wrong! Try 20 minutes of scrubbing with soapy hot water. Annoying. 


So the way to cut a wine bottle in half is to score the bottle, then take a candle and heat the score line until it starts cracking, then submerge the bottle into cold water. The heat differential causes the bottle to break. Although, I had a slightly scary experience with this bottle. There was a small amount of water in the bottle while I was heating the score lines. The water vaporized and pressure built up and a piece of the bottle just shot out. Thankfully, it did not shoot in the direction of my face.

Not quite half a bottle, but a chunk is missing.
Unfortunately, the heat caused another part of the bottle to crack. But it wasn't bad enough to prevent me from using the bottle.
Cracked :/

I drilled two holes into the base of my ship and glued in wooded dowels, which would serve as my masts. I wanted to use a clear bottle so I could make rooms below deck and actually have them seen. So I had to add in a floor.


I glued in two walls. My three rooms are a holding pen for pirates (I think it's called the brig?), the captain's room and the sailors' quarters.  I got to test out my sculpey skills to make the furnishings of the rooms. The cloth things are supposed to be hammocks.
\
Overview

Captain's room

The Brig 

Sailor's Quarter
The next phase was creating the above deck area. I cut out a wood floor. I put up my sails and made a rope ladder. On deck, there are 2 cannons, a pile of cannon balls, a barrel and, of course, a steering wheel.


Avast!

Sailor's quarter with ambiance. 

Captain's room. Note the bookshelf.

 Final Product:


If I had more time and patience, I would have liked to add a crow's nest, more rope and maybe draw in some portholes below deck. But as you can see, I'm a little past the deadline. But I think 3:45 am on Friday counts as late Thursday night, don't you?

Friday, March 2, 2012

Project 3: Sanctuary in a Box

So clearly I'm a little behind schedule. This project had a lot of little details that ended up taking more time  than I expected. But at least I got it done. So this week I decided to make a box with a scene of a forest in it. Well, it's a tiny forest since it only has two trees, but that's okay. If I have more time later, perhaps I'll add more to it. I took lots of pictures, so get excited.
The Process
I built the sides of the box first. 
Creating two halves like this insures that I have two right angles.
This will overall make the rest of my box square. A box that is not
square is VERY irksome. 

Four sides. Basically square. :)
Then I built the base of the box. The blue piece is supposed to be a river.
Over the river and through the woods...
I soldered one of the pieces of grass on an angle to try and create the illusion of a hill. I made the two trees out of copper wire. I twisted a bunch of wires together and 'fluffed' the branches out. 
I soldered the trees to the base and then I attached the base to the rest of the box. I put a lid on the box to finish it off.
Finished Product:
Ta dah!
Notice the swing?
A different angle.
Aerial view. What are those two holes for?

So you may be wondering, 'what was so time consuming about this project exactly?' I decided I wanted to be able to light the box up and have it look eerie and ethereal. So I wired some LEDs to add some ambiance. However, I'd never done any sort of wiring at all, so it took a little while to get it right, but once I got it, I was glad I went through the frustration of figuring it out. Ideally I'd like to use a warmer light, but I guess I can't be too picky for a week's worth of work. So below are the pictures of the box lit up.
Light! Notice the wiring on top. 
It sort of reminds me of Into the Woods.


 So that's this week's project! I hope you liked it. I'll try to be timely next week. :)